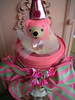
Monday, January 26

Think Monday Think ATC!

ATC 279

The TMTA challenge this week is Ice Blue!

I have had to improvise slightly because I only had plain old run of the mill blues ... you know the ones I mean!

Anyways I used my plain old run of the mill blue and painted over the top with a Viva silver pearl pen ... and ta da! Ice Blue!

I love this stamp and I am ashamed to admit this is the first time I have actually used it ... well apart from making the laminated sheet to store it on of course ... and that does n't really count!

Have a good week everyone and Thank you for popping by.

Sunday, January 25

Sunday Postcard Art!

Cats postcard

This is my first attempt at the Sunday postcard challenge. The them is cats so I thought it would give me the purrfect opportunity to use my cat stamp for the very first time!

Purrfect ... Do you get it???

I am not really a cat lover ... more of a dog lover ... I do have one very special cat friend called Alfie ... He appears to be the only cat in the whole world that actually likes me! And I like him ... a lot!

Anyway ... back to my postcard. I bought this stamp a while back and never got around to using it! My friend said she liked the way it spelled cats! ... Do you know? ... I had n't even noticed! C'mon ... be honest ... Did you?

I am Getting Really Bad ...

HCA BothFriends

... at this blogging lark! In fact I have n't blogged because I have n't crafted much!

I thought it was about time that I caught up on a swap and some challenges ... so here goes ... bare with me!

This is my friends collection for a swap I am in. All HCA Greenfriend completely inspired by Jo Capper-Sandon ... details of the stamps used are here!

All the embellishments have been made out of an old book which fits nicely with the TGiF challenge ... which is books!

HCA BlueFriend All the blue ones fit in nicely with this weeks Sunday Stamper challenge which is Blue.

I suppose I had better tidy the mess I have made now so I can get on with my long list of cards that I need to make ... not forgetting finishing touches to my circle journal and ... oh yes ... the next Aussie Dare is due any day and I have some other design submission work to do!

Where does the time go?

Monday, January 19

Queen For a Day!

ATC 278 Apparently today is the gloomiest day of the year ... so I have gone for citrus colours to try and brighten things up a bit!

The TMTA challenge this week is ... yes you've guessed it Queen for a day!

I think my ATC turned out to be a bit of a self portrait ... I know I don't look like my Queen ... Thank you for pointing that out! But I do actually go from being a drama Queen to not being a drama Queen on a regular basis ... sometimes I can be both in a day ... or even in an hour or actually within the same ... erm ... 5 minutes!

Please tell me that I am not alone!

The checkered background is from the Artistic Stamper range and the lady is from the Tim Holtz cube! The text stamps are all Catslife press.

Oh and I nearly forgot ... Copper Krylon ... one of those things I just had to have at the time and poor thing spends most of it's time stuck in a drawer riddled with jealousy because it's Gold sister spends most of it's day on my craft desk!

Sunday, January 18

Somewhere for my tools!

vanessatin The Saturday workout this week is to alter a tin. I have had my art tools in a plain old baked bean can for a while now so this was the ideal opportunity to do something about brightening it up a bit.

This is also my entry for the Objet d'art challenge where the main character is also a tin.

The stamps I used are Vanessa from Paper Bag Studios and the art background is from Stampers Anonymous.

The charms are from Tim's ideaology range ... vanessatin3 which I absolutely love ... no surprise there then.

Sorry about the awful pictures ... but What's a girl to do? ... I am no David Bailey!

Right - I need to go tackle a pile of ironing now ... I may be some time!

Monday, January 12

Post 301 :0)

ATC 249Cor blimey this is my 301st post - where did all that time go? I don't just mean the other 300 posts either - I have been sat here like a lemon for an age trying to publish ... What is wrong with Blogger tonight?

Back to the point Linda ... which is ... Automobiles is the theme for this week's TMTA challenge.

My ATC is an Ode to He who could craft on water - Mr Tim Holtz, the man himself! Mainly because I watched him ... in person ... and yes he is that good looking and lovely in real life ... but I digress ... he made a tag with this particular colour choice and car stamp. *and breathe*

The little word stamp is 7gypsies. Hope you all had a good day; I am off to do some brain training :0)

Sunday, January 11

Sunday Stamper!

ATC 277 Evening all!

This week's Sunday Stamper challenge is Green, Green, Grass of home!

I make no apology for the fact that my ATC was completely and utterly inspired by the fabulous article by Jo Capper-Sandon which was quite rightly placed on the cover of this month's Craft Stamper magazine.

It is the first of a series of six friend's ATCs I am making for a swap I am in! The main stamps are Art journey and the spotty bits are from the Paper Bag Studios journal sheet.

For my flower I used an old book rather than newspaper coz you have to be faster than Flynn in this house to grab the paper before OH recycles it! *Groan*

By the way - who was Flynn - anybody know where that expression originates from?

That's all folks!

Thursday, January 8

Dare 44: Wet!

canvas 0109 It is that time of the month again and I only have one day left at work this week - Woo Hoo!

Do you see how easily I get side tracked! Anyways ... it is that time of the month again ... Dare time! As you know I am on the creative design team for Aussie Dare site: How Dare you? and this month's challenge was Wet!

Now I really had to get my thinking cap on for this canvas 0109a one! I went with wet paint, wet ink and wet glue! As you can see the finished article is a dry canvas! So I put some little droplets canvas 0109b onto the stampbord to make it look like dew ... which is the wettest look I could come up with!

I will not be apologising for using Claudine Hellmuth's sticky backed canvas again ... I really really love it! Once you have mounted it onto aluminium sheet it can be moulded and sculpted and keeps its shape totally - plus you can have it any colour you like ... which means fabulous embellishments on ... erm ... everything!

The flower stamps are Stitchels Dotty Dots and Stitchels Dotty Dot Minis.

Scor-it!

Scor-it1

1.    Cut four pieces of card 8 ¼” by 5 ¾”
2.    Score all four pieces of card 2 1/16” from  each end to form a tri-fold.

Scor-it2

3.    On one piece score again at 1 7/8“ from each end to form a mini spine.

Scor-it3
4.    Line all the corners up and round them off together using the Zutter ½” Round-it-all.

Scor-it4
5.    Cut a further piece of card 8” by 5 ½“ and score down the middle and round all four corners.

Scor-it5
6.    Line the three tri-fold cards up end to end and tape the middle flaps to the outer two cards so you now have a long card.

Scor-it6
7.    On your spined card make holes at 2 ¾” and 3 ½” approx ¾” in from the spine on each side with your Zutter Rivet hole punch tool.

Scor-it7

8.    Now cut a straight line from each edge of your circle to form a slot.

Scor-it8
9.     Feed a piece of ribbon through the slot that is long enough to go around the card and tie.

Scor-it9
10.     Adhere the back of the middle part of your long card to cover the ribbon part of your spined card.

Scor-it10
11.     Adhere your final card to the front of the middle part of your long card to form an insert.


12.     Decorate as desired!

Monday, January 5

Not a Cowboy in Sight!

ATC 276

Part of me thinks that I should apologise for the fact that not an awful lot of work went into this ATC.

And part of me thinks that if I added anything to this beautiful "Elder" image ... well I would ruin it!

He is so lush and I am so grateful to TMTA for giving me the opportunity to dust him down! He is my favouritist ever SA stamp!

So I have water coloured him a bit and added a vintage text border stamp to the bottom and a dash of gold Krylon around the edge!

The theme is Cowboys and Indians ... Why no cowboys? I hear you ask! Well I was always the indian ... sadly my brother was the only person in our house to own a sheriffs badge ... so he got to choose ... it was n't all bad ... I got to wear a poncho :0)

Sunday, January 4

Black and Gold!

Tag 0109 Talk about the hangover from hell ... that is the last time I binge drink ever! I wasted the entire day on the first of January in bed due to too much drinking. That is a wasted 24 hours of valuable crafting time. And I have been playing catch up ever since!

So my New Years resolution is no binge drinking ... ever! I am just too old!

OK - now I have recorded that for prosperity ... more about the tag. Well it is black and gold which is the theme for this week's Sunday Stamper and I have embossed everything on it which was the brief for this week's Penny Black Saturday challenge.

All the stamps used [apart from the Penny Black Tag 0109b one :0)] are Stitchels and I have made all the flower embellishments using Claudine Hellmuth sticky backed canvas ... I painted it black, embossed it ... yup embossed it  ... with gold ... mounted it onto aluminium sheet and then cut them out and moulded them around each other.

If you have n't tried the canvas sheets yet - you really need to ... I totally love them!

Thursday, January 1

Making My ATC 9'er!

Once again ... there is nothing difficult involved ... this is what I did!
ATC9a
1. Cut a plain piece of card 3 ATC widths wide and 3 ATC lengths long. Then stamped images onto the card using Versamark ink and clear embossing powder.
ATC9b
2. Blended two colours of distress ink over the design. I used Broken China and Pine Needles.
ATC9c
3. Placed a sheet of copy paper over my work and iron over the design. Once the stamped pattern showed through I set the iron to one side and removed the paper.
ATC9d
4. Then I Blended Old Paper distress ink over the entire pattern.
ATC9e
5. I stamped patterns all over the design with Broken china and Pine needles distress ink. I nearly abandoned it at this point because the stamp in the middle looked awful!
ATC9f
6. I then stamped an design over the entire sheet using Ranger jet black archival ink. I only lightly inked the stamp at this point because I did n't want my images too dark.
ATC9g
7. I cut the sheet up into 9 separate ATCs
ATC9h
8. I then worked on the ATCs individually. I added to the boring bits with individual embellishments and some silver embossing.
ATC9j
9. I stuck an old book page to some card and stamped 9 butterflies. I cut these out ... coloured them with Dusty Concord distress ink and added one to each ATC.
ATC9ers
10. This is the finished piece. 9 ATCs that work as one piece or individually.

Beer Mat Basics!

Many people have asked what I do to prepare the beer mat for decorating. There really is no hidden secret ... it is as basic as this ...
BMT1
1. Glue the Beer Mat to some card stock.
BMT2
2. Cut around the Mat.
BMT3
3. Sand the edges to blend the card in with the mat.
BMT4
4. Colour the card stock as desired to form your canvas.
BMT5
5. Your Beer Mat is now ready for your art ... Have fun!
Please come back and share you work :0)

WOYWW!

WOYWW

OK! This is the deal ... this is my compromise!

If this is really a secret hand shake ... well I can hide it in the depths of my blog archive and no one will mind ... hopefully!

The day is Wednesday 19th August 2009 ... it is 12.53pm and my work desk looks like this!

Now don't go feeling sorry for me ... my craft room Beauty 3a is 15ft by about 12 ft and there is more than enough room to put things away! I have a friend coming to play tomorrow and I really need to tidy up!

My third altered CD has gone horribly wrong ... look at this girl's teeth and my daughter's birthday is on Friday and I have n't made her a card yet ...

Oh my god ... this is like therapy ... I am going to stop before I tell you my deepest darkest secrets ...

** Coffee Break Makes - A Quick Slice **

CBC2

Ingredients:-

1X square card [15cm x15cm]

1X mirri board [14.5cm x14.5cm]

1X black card [14cm x14cm]

1X patterned paper [13.5cm x 13.5cm]

1X crown brad

A selection of patterned papers

Your choice of letters cut to size on the slice or another die cutting machine

3d foam pads

Method:-

1. Matt the black card onto the mirri.

2. Place your letters where you want them and stick them down with 3d foam.

3. Pierce a hole and attach the crown brad above one of your top row letters

4. Stick the completed matt to the front of the card.

5. Add an insert and your card is complete.

Tips:-

Any letters will do. I have used this design for personalised cards and also made a wedding card using Mr. and Mrs.

If you have longer than 10 minutes ... why not cut out the letters on white card and stamp different patterns onto them!

Every Monday I will post a card design that will take you 10 minutes or under to make! Please help yourself to these designs ... and if you use them ... post a link ... I would love to see what you did!

**Coffee Break Makes - Teen Birthday**

CBC1

Ingredients:-

1X square card [15cm x15cm]

1X mirri board [14.5cm x14.5cm]

1X black card [14cm x14cm]

4X silver brads

1X A5 sheet white card printed with a greeting or a name repeatedly and cut into the number 6

1X stamped image in black and white

3d foam pads

Method:-

1. Matt the black card onto the mirri, pierce a hole in each corner and place a brad in each hole.

2. Stick the completed matt to the front of the card.

3. Cut out your stamped image and place on the card next to your number with 3d foam pads.

4. Add an insert and your card is complete.

Tips:-

Any stamped image that can double as the number one will do, I used Paperartsy USPT3 - Passing time for mine ... but I have used the Daniel Torrente Stampotique images for a more girly feel. You want the image approximately the same size as your number.

Change the printer ink and card colour to suit.

Any number will do ... 12,13,14,15 and so on!

Every Monday I will post a card design that will take you 10 minutes or under to make! Please help yourself to these designs ... and if you use them ... post a link ... I would love to see what you did!

**Coffee Break Makes - New Baby**

CBC

Ingredients:-

1X square card [15cm x15cm]

1x plain pink card [14.5cm x14.5cm]

1X patterned pink paper [14cm x14cm]

1X plain pink card [8.5cm x 8.5cm]

1X patterned pink paper [8cm x 8cm]

1X circle funky foam [5cm dia. approx.]

1X small piece sticky ribbon

2X pink buttons

2X gems

1X small length craft wire

1X peel-off or stamped sentiment.

Method:-

1. Matt the patterned paper onto the card stock.

2. Cut a quarter from the funky foam circle.

3. Cut wire into two pieces - curl one end for handle and make a U with remaining piece; cross this over for wheel axle.

4. Glue the wire onto the back of the circle and add sticky ribbon to form pram base.

5. Glue onto card.

6. Add buttons for wheel and decorate with gems in the centre.

7. Add a peel-off or other sentiment.

8. Finally add your insert.

Tips:-

I use silicon glue for the pram as I find it very secure and forgiving. I also use a circle punch, however, drawing around the bottom of an aerosol will also do the trick.

This card looks great in any colour depending whether you are making for a girl or a boy - I use yellow and green too, for those that don't know yet!

Every Monday I will post a card design that will take you 10 minutes or under to make! Please help yourself to these designs ... and if you use them ... post a link ... I would love to see what you did!

**Coffee Break Makes!**

In between making a mess ... I make charity cards and have done for about 5 years. A lot of you will know that in order to keep costs down you need simple card designs that you can make in minutes ... that will also sell!!!

Well I thought I would share my file of designs with you ... some of you will have seen a few before ... but this time they come with full instructions. Please check back each Monday and let me know your thoughts!

You know like ... good idea! ... bad idea! ... bad instructions! ... rubbish cards! ... too basic! ...that kind of thing!

And if you don't sell your cards ... check back anyway ... it is always useful to have quick card designs handy for that last minute panic ... NO! don't tell me I am the only one that does that ... I don't believe you!

Don't forget these designs are not intended to show your range of card making skills they are intended to make money ... the more you make ... the more money you can make for that special charity or extra stash!

And don't forget to tell your friends!

Twitter

A Crafting Journey