It's official ... I am a bit of a numpty! I did take my camera to Ally Pally ... I did n't take any pictures ... and if I had ... well you could n't see them anyway ... because I left said camera there!
So ... no pictures tonight I am afraid ... but Thank you all so much for wishing me well ... I had a wonderful time ... did lots of demos ... made lots of new friends ... met lots and lots and lots of bloggers ... and the best bit ... I get to do it all again tomorrow... Thank you to everyone who popped over to the stand to say Hi!
What I did discover today was that lots of people still want to know how to make roses ... so as promised ... here is a quick tutorial to get you on your way!

1. Stamp/die cut three 6 petaled flowers ... there are lots of stamps out there and dies ... dig through your stash ... you will be amazed how many you can find.

2. Find the centre of each flower ... this does n't have to be precise and cut as illustrated. One flower has one cut to the centre line. The next you remove one petal and finally remove a two petal segment from the third. You will need all these pieces to make your rose.
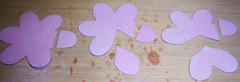
3. If you are working with normal card stock you can skip this step. But if you are working with Grungepaper you need to remove the top off each petal left of the cut on each of the three larger sections ... again as illustrated. These bits can be put to one side or in the bin ... you won't need them.

4. Now is the time to colour and stamp on your pieces. This way you will ensure you have no dodgy grey bits showing up in your final rose.

5. Take your three larger pieces and over lap a full petal onto the section where you have removed the petal end... they should look kind of cone shaped. Glue with Glossy Accents and clip. These will take about 10 minutes to set enough for you to finish your rose.


6. Take your two petal section ... patterned side facing you and curl the left petal back. Be nice and firm ... they call it paper but trust me ... it is very strong and the firmer you are the better the curl. The better the curl ... the better the rose!

7. Now roll the petal that you have just curled in towards the flat petal and form a cone shape as illustrated ... where this touches the second petal add some Glossy Accents and clip.

8. The final single petal just needs to be rolled. You don't need to glue this ... but if you clip it for a while it will hold it's shape better. As you make more roses ... you may want to change this step ... there are lots of tutorials out there ... just pick the method that is best for you. But starting out ... this is definitely the easiest way.

9. When your pieces are dry ... Curl all the petals back as in step 6. Cut the bottom off each section. Don't be frightened to cut a good amount off and sit them inside each other ... before gluing them to see how they lay. If your rose looks more like a cabbage ... cut a bit more off ... offset the petals ... imagine a real rose and just sit each piece inside each other. With the single petal roll it up tightly ... cut it in half and put it inside the cone of the two petal section ... this will form the centre of your rose. If you did n't stick it ... it will open just as far the the cone allows and gives your rose a nice centre.
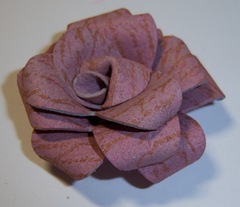
10. Once you are happy with the way your rose is sitting ... glue each section together with Glossy Accents. These little flowers really are very simple to do and sooooo addictive ... Enjoy :0)
Righty-Ho ... another early start for me ... if you have any questions I will do my best to get back to you quickly ... and I promise to take piccies at Ally Pally today :0)
Have a good day and Thank you again for all your lovely comments.